ラファエロの名画「バラの聖母」の異常な信号をAIが検出しました。Pythonで絵画を分析する具体的なコードなどを紹介します。
AIはラファエロの他の作品を使って訓練され、絵の筆跡や色彩、陰影など分析を分析します。聖ヨセフの顔の出来が他の部分と比べて劣ると以前から言われていましたが、AIによる分析で裏付けられました。
ラファエロの名画「バラの聖母」の異常な信号をAIが検出
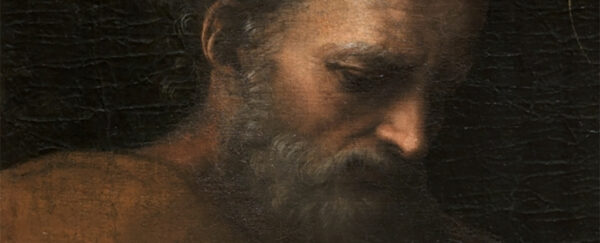
人工知能(AI)がラファエロの名画「バラの聖母」に隠された異常な信号を検出したと紹介されています。「バラの聖母」の中に描かれている聖ヨセフの顔が、実はラファエロによって描かれたものではない可能性があることが明らかになりました。
研究者たちは、ラファエロの他の作品を使ってAIを訓練し、ラファエロのスタイルを細かく識別できるようにしました。AIは、絵の筆跡や色彩、陰影などを詳細に分析する能力を持っています。
以前からラファエロの「バラの聖母」の真贋について議論があり、特に聖ヨセフの顔の出来が他の部分より劣ると言われていたそうです。
なお、この研究は、AIが美術の分野で専門家を助けるツールとして役立つことを示しており、AIが芸術専門家に置き換わるものではないと説明されています。
ラファエロの名画「バラの聖母」解析に使われたIT技術とは?
ラファエロの名画「バラの聖母」の中の聖ヨセフの顔が、実際にはラファエロによって描かれたものではない可能性を、AI技術を使って明らかにしたということですね。
この研究で使用されたプログラム言語、AI技術、クラウド技術などを推測してみましょう。
- プログラム言語: 研究で使用されたAIアルゴリズムを開発するためには、プログラミング言語が必要です。一般的に、AIや機械学習にはPythonという言語がよく使われます。Pythonは簡単で読みやすく、機械学習に関する多くのライブラリがあります。
- AI技術: 記事には「ディープフィーチャーアナリシス」と「サポートベクターマシン」という伝統的な機械学習技術が使われていると書かれています。機械学習は、画像の細かい特徴を把握して、芸術家のスタイルと比較するために使われます。
- ニューラルネットワーク: 研究では「ResNet50」という名前のプリトレーニングされたニューラルネットワークアーキテクチャを使用しています。ニューラルネットワークアーキテクチャは、深層学習と呼ばれるAIの一種で、複雑な画像認識タスクに適しています。
- クラウド技術: 記事には直接言及されていませんが、大量の画像データと高度な計算能力を必要とするため、AWSやGoogleクラウドなどのクラウドベースのコンピューティングリソースが使用されている可能性が高いです。
上記の技術を組み合わせて、AIはラファエロの名画「バラの聖母」の異常な信号を見つけ出したと推測できます。
Pythonの機械学習で絵画を分析する
Pythonで、「ディープフィーチャーアナリシス」と「サポートベクターマシン」という機械学習技術で絵画を分析するサンプルコードを紹介します。
import numpy as np
import matplotlib.pyplot as plt
from sklearn import svm
from sklearn.decomposition import PCA
from sklearn.preprocessing import StandardScaler

# Sample data generation
# Let's assume we have two types of features extracted from images, e.g., texture and color
# Class 0: Represents Raphael's style
# Class 1: Represents other artist's style

np.random.seed(0)
features_raphael = np.random.normal(loc=0.5, scale=0.2, size=(100, 2))  # Features for Raphael's paintings
features_other = np.random.normal(loc=-0.5, scale=0.2, size=(100, 2))   # Features for other paintings

# Labels for the classes
labels_raphael = np.zeros(100)  # 0 for Raphael
labels_other = np.ones(100)     # 1 for other artists

# Combining the data
features = np.concatenate((features_raphael, features_other), axis=0)
labels = np.concatenate((labels_raphael, labels_other), axis=0)

# Feature scaling
scaler = StandardScaler()
features_scaled = scaler.fit_transform(features)

# PCA for feature reduction and visualization
pca = PCA(n_components=2)
features_pca = pca.fit_transform(features_scaled)

# Plotting the data
plt.figure(figsize=(8, 6))
plt.scatter(features_pca[:100, 0], features_pca[:100, 1], color='blue', label='Raphael')
plt.scatter(features_pca[100:, 0], features_pca[100:, 1], color='red', label='Other Artist')
plt.xlabel('Principal Component 1')
plt.ylabel('Principal Component 2')
plt.title('Feature Space After PCA')
plt.legend()
plt.show()

# SVM Classifier
clf = svm.SVC(kernel='linear')
clf.fit(features_scaled, labels)

# Print SVM details (for demonstration purposes)
print("SVM Classifier Details:")
print(f"Intercept: {clf.intercept_[0]}")
print(f"Weight Vector: {clf.coef_}")
SVM Classifier Details:
Intercept: -0.09142463197517853
Weight Vector: [[-1.14286058 -1.16747048]]
上記は、サポート・ベクトル・マシン(SVM)を使って絵画の特徴を分類するPythonのサンプルコードです。
Pythonコードには、サンプルデータの作成、特徴量のスケーリング、可視化のための主成分分析(PCA)、SVM分類器の学習が実装されています。
まず、ラファエロと他の芸術家のスタイルを表す2種類の特徴を生成します。次に、特徴をスケーリングし、可視化のためにPCAを適用しています。最後に、データに対してSVM分類器を訓練します。出力には、PCA後の特徴空間を示すプロットと、学習されたSVMモデルの詳細が実装されています。
上記のPythonサンプルコードは、芸術スタイルを分類するために、機械学習を適用する基本的な例です。実際の実装はより複雑で、ディープラーニングやより洗練された特徴抽出手法が必要です。
Pythonのニューラルネットワークで絵画を分析する
次に、Pythonのニューラルネットワークを利用した絵画の分析方法を紹介しましょう。
import numpy as np
import matplotlib.pyplot as plt
from sklearn.datasets import make_blobs
from sklearn.neural_network import MLPClassifier
from sklearn.model_selection import train_test_split
from sklearn.preprocessing import StandardScaler

# Generate sample data
X, y = make_blobs(n_samples=100, centers=2, n_features=2, random_state=42)

# Split the data into training and test sets
X_train, X_test, y_train, y_test = train_test_split(X, y, test_size=0.3, random_state=42)

# Feature scaling for optimal performance
scaler = StandardScaler()
X_train_scaled = scaler.fit_transform(X_train)
X_test_scaled = scaler.transform(X_test)

# Create a neural network model (here, a simple MLP is used for demonstration)
model = MLPClassifier(hidden_layer_sizes=(100,), max_iter=500, alpha=1e-4,
                      solver='sgd', verbose=10, random_state=1,
                      learning_rate_init=.1)

# Train the model
model.fit(X_train_scaled, y_train)

# Evaluate the model
print(f"Training set score: {model.score(X_train_scaled, y_train)}")
print(f"Test set score: {model.score(X_test_scaled, y_test)}")

# Plot the decision boundary
def plot_decision_boundary(model, X, y):
    x_min, x_max = X[:, 0].min() - 1, X[:, 0].max() + 1
    y_min, y_max = X[:, 1].min() - 1, X[:, 1].max() + 1
    h = 0.02  # step size in the mesh
    xx, yy = np.meshgrid(np.arange(x_min, x_max, h), np.arange(y_min, y_max, h))

    Z = model.predict(np.c_[xx.ravel(), yy.ravel()])
    Z = Z.reshape(xx.shape)

    plt.contourf(xx, yy, Z, alpha=0.8)
    plt.scatter(X[:, 0], X[:, 1], c=y, edgecolors='k', marker='o', s=20)
    plt.xlabel('Feature 1')
    plt.ylabel('Feature 2')
    plt.title('Decision Boundary of Neural Network')

# Plotting the decision boundary
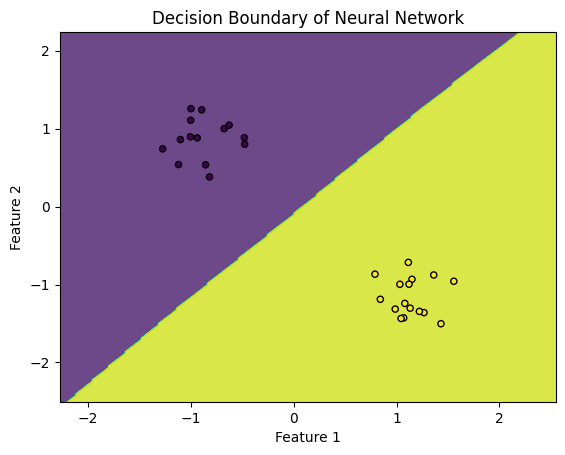
plot_decision_boundary(model, X_test_scaled, y_test)
plt.show()
Iteration 10, loss = 0.02752848
Iteration 11, loss = 0.01955439
Iteration 12, loss = 0.01413034
Iteration 13, loss = 0.01040183
Iteration 14, loss = 0.00780473
Iteration 15, loss = 0.00596915
Iteration 16, loss = 0.00465179
Iteration 17, loss = 0.00369168
Iteration 18, loss = 0.00298159
Iteration 19, loss = 0.00244864
Iteration 20, loss = 0.00204311
Iteration 21, loss = 0.00173021
Iteration 22, loss = 0.00148571
Iteration 23, loss = 0.00129232
Iteration 24, loss = 0.00113764
Iteration 25, loss = 0.00101262
Iteration 26, loss = 0.00091064
Iteration 27, loss = 0.00082663
Iteration 28, loss = 0.00075681
Iteration 29, loss = 0.00069835
Iteration 30, loss = 0.00064902
Iteration 31, loss = 0.00060712
Iteration 32, loss = 0.00057130
Iteration 33, loss = 0.00054051
Iteration 34, loss = 0.00051389
Iteration 35, loss = 0.00049076
Iteration 36, loss = 0.00047056
Iteration 37, loss = 0.00045285
Training loss did not improve more than tol=0.000100 for 10 consecutive epochs. Stopping.
Training set score: 1.0
Test set score: 1.0
上記のPythonコードでは、ニューラルネットワークを用いた分類タスクを実行し、決定境界を可視化します。
Pythonによるニューラルネットワーク分析は、実際の画像分析でよく利用されます。
まとめ
ラファエロの有名な絵画「バラの聖母」の中に描かれている聖ヨセフの顔が、実は別人によって描かれた可能性のニュースを紹介しました。この発見は、人工知能(AI)を使って分析した結果です。
絵画の分析には、Pythonなどのプログラミング言語や、クラウド技術が使用されます。
記事では、AI技術は芸術専門家を置き換えるものではないと説明されています。しかしAI技術がないと、芸術的な分析は困難なのが現状です。
あなたもAIエンジニアに転職して、世界の名画に隠された謎を解明しましょう。

▼AIを使った副業・起業アイデアを紹介♪


